toedscruel ogerpon
by ray chen
Table of Contents
Introduction
Hi everyone! My name is Ray Chen, I just got back to back top cut placements in Portland regionals and at the North America International Championships, and today I’m going to be teaching you all what I know about my deck, Toedscruel ex.
Here’s my agenda for the day: First, I’m going to discuss the decklist itself, including the roles of each card in the deck, the general game plan of the deck, and resource conservation. I consider all of these things to be one big overarching topic, which I’m going to call the “General how to play.” Then, I’m going to get into one of the most important parts of maximizing your winrate with the deck: sequencing, including basic sequencing and when you should consider the context of the game. Last, I’m going to discuss in detail how you should adjust your gameplan for specific matchups.
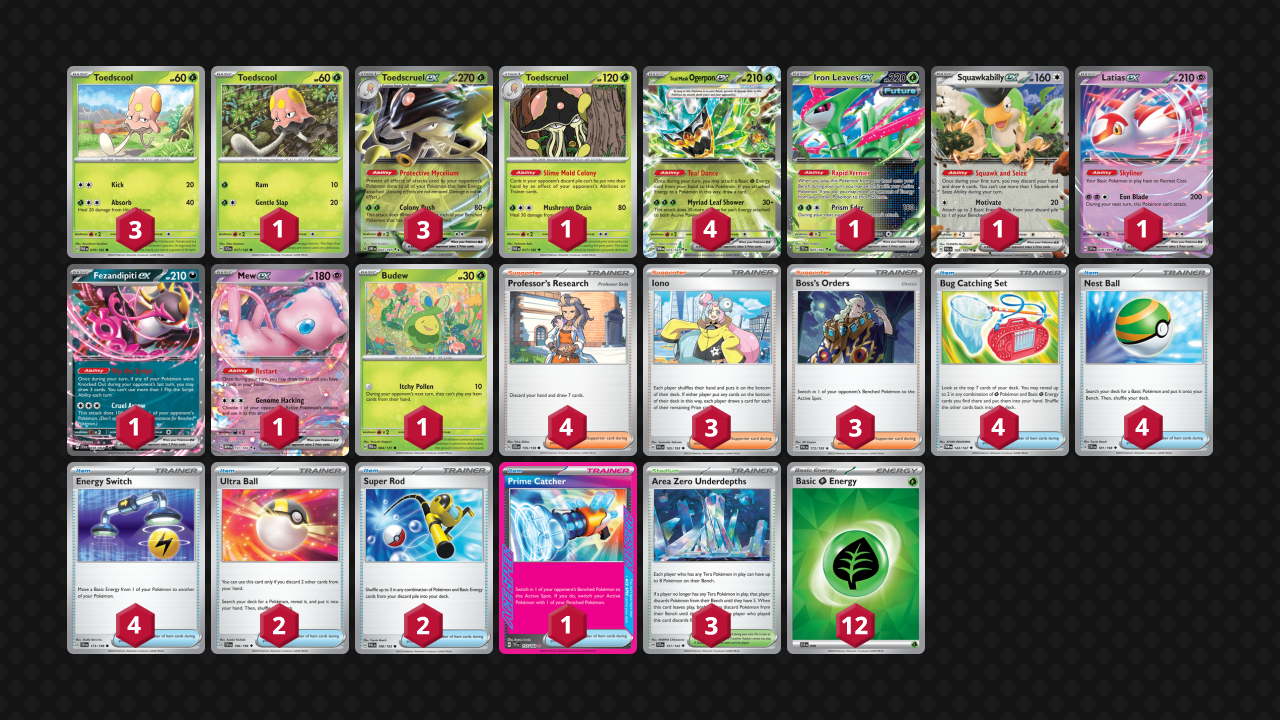
Decklist
General Game Plan
Starting with the general game plan, I would like to first say that Toedscruel is an aggressive deck, and you should go into the game with that in mind. In every matchup, you want to be the player who is ahead in the prize race, which means you are taking the first 2 prizes in the aggro mirror matchup, or getting the first attack in any slow matchup against an evolving deck. Another part of the general gameplan: with the exception of certain matchups, you should always go second with the deck. Not only is the deck way more consistent going second, but your opponent will likely be less consistent, and it is quite easy to cheese games with either Budew or Ogerpon donk. With that, let’s discuss the first category of cards in the deck: the attackers.
The main attacker of the deck is Toedscruel ex. For those who don’t know, Toedscruel ex has two very important lines of text: Its ability, protective mycelium, prevents any effects of attacks done to your Pokemon with energy attached. This has shocking applications in a wide range of matchups, including preventing Dragapult’s phantom dive, Maractus’s corner, Munkidori’s mind bend, and TM Devo from the Grimmsnarl deck. Its attack, Colony Rush, does 80 + 40 for each benched Pokemon you have with a grass energy. What we’ll get to in a bit, is how well this attack combos with Teal Mask Ogerpon ex, allowing you to easily build to 240, 280, or even 320 and 360 damage with an area zero underdepths in play, if necessary. Basically every game, you should expect to set up at least 2 of these throughout the course of the game. One thing to consider is that going first, this is probably the attacker you will want to be using on turn 2, so if you’re up against Budew, it’s often good to just hold a hand that has a Toedscruel ex and the second energy you need to be attacking with it.
Next up, the second most important attacker of the deck, Teal Mask Ogerpon ex. This is going to be the Pokemon that you attack with turn 1 going second most often. All it takes to get the Ogerpon up and attacking on turn 1 is 2 Ogerpon in play, 1 energy switch, and 3 energy. Given that you will have Squawkabilly, Mew, a draw supporter, and the teal dances themselves, as well as the broken consistency card, Bug Catching Set, this turn 1 attack is surprisingly consistent in the deck. Myriad Leaf Shower has a lot of applications: it one shots any Pokemon 120 hp or less, while also taking out a powered up Charizard, Grimmsnarl, or N’s zoroark ex. Because of this, you’ll be using Ogerpon in a wide variety of situations both early and middle game, although late game, I’d say you should expect to be using only Toedscruel ex or Mew ex, except against grass weak Pokemon.
Between Toedscruel ex and Ogerpon ex, there is one really important thing to consider: the total amount of energy you can put into play on a single turn. Say you end the turn with a total of 3 energy in play. If you know you’ve prized one Ogerpon, that means that at most you can put 4 more energy into play on the following turn, with 3 teal dances and 1 attach for turn. That actually caps your total damage output for next turn to 280 damage. When thinking about this, it also gets even more interesting when you consider that whatever you have active could get KO’d next turn. Like, if you have 4 energy in play now, but your Toedscruel with 2 energy is about to go down, and you’ve prized a teal mask, you’re actually capped to a measly 240 on the next turn! So, prioritize getting teal masks down as much as possible.
Last thing I want to say about the main attackers of the deck is that you should just know the numbers by heart. 4 benched energy = 240, 5 = 280, 6 = 320, teal mask does 120, 180 if your opponent has 2 energy attached, 360 if it’s 2 energy attached and they are grass weak.
Third most common attack is the most annoying little vegetable, Budew. There’s about a billion use cases for this card, so I’m just going to mention a few, and I’ll say that you should decide for yourself whether it’s the right time to Budew or not.
- You’ve whiffed turn 1 teal mask attack and your opponent only has a poor setup, say, 1 Dreepy. Budew to prevent them from poffining, which could snowball into a larger advantage in the following turns.
- You’re going second against an aggro deck like Raging Bolt. Budew makes it very difficult for your opponent to take 2 prizes on the next turn.
- Your opponent has just used Pikachu ex and they are threatening to Pikachu again next turn with a Crispin. Budew prevents prime catcher + Crispin while also negating Pikachu’s ability.
- Your opponent has used Gholdengo, discarding a bunch of energy, and you have whiffed the baby Toedscruel this turn.
- Your opponent has hit you with a 60 damage Drifloon and giving up one free prize to Munkidori doesn’t change the prize race in this situation.
There are many more, but I’d say that those 5 situations are definitely the most common.
One thing I’d like to say is that across all my games with the Toedscruel deck, I’ve used literally every single legal attack in the deck at least once. Yes, every single one, and at one point or another they were all optimal. Because of this, I’m going to mention the edge cases for all of the following attackers.
Iron Leaves prism edge: this is the turn one attack you should go for if your opponent has left Squawkabilly or Mew active, or if you’ve whiffed teal mask attack AND it will literally be game if you do it. Say like, they have just Dreepy and one Munkidori benched and getting any sort of attack here will put you just so far ahead. That being said, you really shouldn’t treat Iron Leaves as one of the main attackers of the deck, and I’ll discuss that more when I get into the resources part of all this.
Mew ex: Shockingly, I use this thing all the time. The most common use is definitely to set up checkmate against a Raging Bolt player, as copying bellowing thunder can easily take the last 2 prizes, even against a Raging Bolt with a bravery charm. That being said, it’s also key if your opponent is on Cornerstone Ogerpon, and is often useful against Eevee box as well (one shotting Flareon). Another weird use case is trying to set up 2 attacks where you dink a Dragapult ex and follow it up by copying phantom dive and taking a Budew down with it all at once. It’s a line I’ve considered many times but to be honest, I’ve never gotten that to work.
Fezandipiti’s cruel arrow. Back in Portland, this thing was actually a monster, because no Dragapult deck had any kind of bench protection. Just stick it active and target down whichever Drakloak had the energy on it, which would almost be game if they didn’t have Luxurious Cape. Nowadays, if your opponent sees you committing energies to the Fezandipiti, if they just have Shaymin it kinda invalidates it completely. If they don’t though, it can still be a valuable angle against Dragapult, as well as in some other weird situations, especially combined with an Iono and a Prime Catcher, trying to get free prizes if you are behind.
Squawkabilly’s motivate. This is really only for when you discard a bunch of energy turn one. Just thought I’d bring it up because first of all, I’ve done it at least 3 times and won 2 out of 3 of those games, and second, it will be vital now that Gardevoir players might be looking at bringing Klefki back. For those who played last format, Squawkabilly was historically an important gameplan in the Regidrago vs Gardevoir matchup, and I expect that if Klefki does make its resurgence, it will be important for Toedscruel in the matchup also.
Baby Toedscruel. While this card is in here mostly for the ability, the attack has some niche uses, as it’s the only 1 prizer in the deck that can one shot a 70 hp Pokemon like a Hoothoot or fan Rotom. Usually though, when I use this attack it means I’ve probably lost the game to be honest.
Toedscool. There were a couple of Toedscool options that I was considering when I was making the deck. First of all, I only considered Grass type Toedscool, because it is vital to be able to hit them off Bug Catching sets. Then, I got rid of the 50 hp Toedscools, because they get KO’ed by Dusclops, and later, Grimmsnarl also. Looking at the remaining options, there is Spore with 2 retreat, Absorb, and Ram Toedscool. I ended up not playing any Spore Toedscools because I don’t really see the utility of it: every deck has at least one out, not to mention that it only works 50% of the time, and if I’m using spore, it probably means I am losing the game anyway. Worst of all, it has 2 retreat, which makes it terrible for trying to move around if Latias is prized or if it’s the one Toedscool I have when area zero is bumped. Between Absorb and Ram: In Portland I ran all Absorb Toedscools, thinking that it’s just the better one. Absorb OHKOs N’s Zorua, Budew, and Impidimp, while also doing 80 against a Cornerstone. That means I can Mew ex a cornerstone, then follow it up with the Toedscool if necessary, setting up all these energy using motivate in the face of low damage output Cornerstone. Because of that, I didn’t feel the need to include any other Cornerstone answer because I was half protected, say, if I happened to run into a stray cornerstone out of a Tera Box deck (I accept the autoloss to walls + healing). All that being said, one of the only 2 changes I’ve ever made from the original decklist was just putting in a single copy of the Ram Toedscool, which my friends and I call “pokey Toedscool.” There is only one use case: your opponent is on Pikachu ex and you’ve prized Budew. “Poking” the Pikachu ex for 10 with a one prizer is an important line, and pokey Toedscool does that just ever so slightly easier than the absorb Toedscool does.
That was the attackers section of the deck. I know, honestly, a lot to look at there, but it goes to show how putting a lot of thought into a deck can really make something special. I once said, “with the Toedscruel deck, you really have to squeeze out the percentage points in every matchup,” and I still stand by that. Utilizing every legal attack in the deck to it’s maximum potential is one way to squeeze out wins where otherwise there would be losses.
Next up, I’m grouping the consistency cards and draw engine of the deck together. The most important of the bunch is the combination of Teal Mask Ogerpon ex and Bug Catching Set. About bug catching set: There are 26 hittable cards in the deck. For reference, a blind bug catching set with no information (Distribution: Population 59, Successes: 26, Sample Size 7, X >= 2) is about 90%. You are 90% likely to hit at least 2 Grass Pokemon or Energy when you play a bug catching set. This alone is what makes the entire deck function, no joke. Without Bug Catching Set, I never would’ve even considered playing this deck. Between Teal Mask Ogerpon and Bug Catching Set, you are actually able to increase the amount of cards in your hand by playing a bug catching set and putting 2 energies in hand, then converting them into any type of card by essentially filtering it through the Teal Mask Ogerpon. This is the main draw engine of the deck. You should aim to set up at least 3 Teal Mask Ogerpon in every matchup, basically as early as possible, so you can start filtering out the energy for real playable cards as soon as you can.
The other important draw Pokemon are Mew ex and Fezandipiti ex. Squawkabilly ex should be treated as a card that you go for only if you need a new hand on turn 1, or if you are extending to try to get an Ogerpon donk. It’s not really a necessary component in most games. Mew and Fez on the other hand, are Pokemon you will want in basically every game, with only a few odd exceptions. Fez especially, when combined with research and bug catching sets, can easily build you to a 12 card hand, even after an unfair stamp. Then, with a combination of good sequencing and filtering your energy through Teal Mask Ogerpon ex, it’s a lot less surprising how the deck is able to go from area zero bumped + stamped to one shotting a Dragapult ex!
The last most important part of the deck is what I call the resources. This include the Super Rods, Gusts, Energy Switches, and to a lesser extent, the Area Zeros.
Super Rod is the most important resource in the deck. In every matchup, you should expect to be losing 5 or more energy between retreats, researches, and your Ogerpons/Toedscruel ex’s getting KO’ed. Also, you want to be recycling teal mask Ogerpons as much as possible if they do get KO’ed, because each teal mask is virtually a free +40 damage in the late game with the deck. Another important use is recycling Mew and Fez, which are by far the most common targets for a good Dragapult player trying to disrupt you late game. And finally, of course, sometimes you just need to recycle your attackers. If I had a nickel for every time I’ve discarded 2 Toedscruel ex on turn 1 before having any kind of deck search, I’d actually have THREE nickels, which is a surprising amount for such a specific situation. In all of those cases though, because of my 2 rods, I was never concerned that I wouldn’t have enough Toedscruel to make it through the game, even if I had prized a rod.
Next up, the Gusts. Nowadays, there are 3 Boss and one Prime Catcher in the deck. Honestly, I’m not sure if it was originally me or my friend Elliot who suggested that idea because I forgot, but he was definitely the one who convinced me that 3 boss was undoubtedly the play. And he was for sure right. That was the only real change from Portland: -1 Area Zero, +1 Boss. Having extra area zero does make the one hit KO’s more plausible into Dragapult ex and Gardevoir, but having extra bosses just makes the deck way more fluid and dynamic in every matchup. I’ll go into detail about when to gust in every matchup later, but the point is, gusting is a vital part of the deck, whether it’s to reach for 2 prize KO’s or to disrupt your opponent’s set up. That’s also why prime catcher is the ace spec.
Sidenote: I did consider some other options for the ace spec of the deck. The most appealing other option was definitely rescue trolley. My problem with the card is that it did basically nothing late game, and after just a little bit of testing, it’s not like the deck has problems finding basics usually, between the 4 nest balls and 4 bug catching sets. Not being able to search out the trolley is what sealed the deal for me. The only other semi serious ace specs are Scramble Switch, Scoop Up Cyclone, and Secret Box, but for Scramble Switch and Scoop up Cyclone, what they do just fits with the aggro game plan less compared to Prime Catcher, not allowing me to reach for a 2 prize KO off of a big research and Fezandipiti. Secret Box is secretly the second best ace spec for the deck, as searching out a stadium, a research, and a bug catching set basically guarantees KO on whatever is in the active. That being said, the discard 3 is a real cost, and what turned me off from it the most is that I can’t play it if I get stamped into it, which is extremely bad, where Prime Catcher would still be great in that situation as long as my opponent had anything relevant to gust on the bench.
Finally, the Energy Switches, where I’m also considering Iron Leaves to be an energy switch. If I had to historically compare the energy switches in this deck to another card, I’d say it’s most like Power Tablet for Mew VMAX, or Electropower for Pikarom GX. They are damage modifiers in this deck. For each energy switch that you draw, you are able to move an energy off an Ogerpon to a non-Ogerpon Pokemon. Given that your Ogerpon can just power itself up with another energy after that, this basically makes each Energy Switch a permanent +40 to all your Toedscruel ex! The reason I’m including Iron Leaves with this is because that is the main function of the card: either you move 2 energy off your Ogerpons and retreat one, netting you +1 Pokemon with a grass energy on it, OR you just have Latias, Iron Leaves, and retreat. If you draw Iron Leaves early, I often discard it, just to rod it back to have, more or less, another damage modifier late game.
There is an avenue of the deck that is very important to consider: When do I just, not play research and chill with my board? For that, I’ve made the following classification of the resources:
- Super Rod (EXTREMELY important)
- Energy Switches (Very important)
- Gusts (Important)
- Multiple Copies of Area Zero in Hand (Situational)
- Draw Supporters (Meh)
- Energy (Meh)
- Pokemon (whatever)
This is how you should treat the value of the cards in the deck. It’s important to try to maximize your Rod value and not waste Energy switches when possible. That being said, don’t be so conservative that you are sacrificing your ability to literally play the game in the name of resource conservation. If you don’t have a lot going on, especially if you don’t have 2 teal mask Ogerpon down, it’s ok to burn resources to set up a little bit.
That is what I had to say about the general game plan of the deck.
Sequencing
Next up, one of my favorite topics in the Pokemon TCG: sequencing! I think of all the things that I did in my stream matches, maybe the only thing I was doing half decently was still being good at sequencing. (I was throwing like crazy in basically all of the matches I played, with the exception of maybe my match against tord, where I thought I played it ok but there were still some other lines I could’ve taken. It's stressful playing on stream to be honest.) Sequencing is the practice of taking game actions in the correct order, and I think it is one of my greatest passions in Pokemon. I actually started out in Juniors playing Archie’s Blastoise in expanded, running my own list that had weird cards like Maintenance in it. I’ve always loved playing sequencing heavy decks, and Toedscruel ex is certainly no exception to that.
As we’ll get into pretty soon, the matchup lines for the deck are really not that hard to understand, especially compared to a deck like Gardevoir ex or Dragapult ex, where you have a lot of damage counter math to worry about. After you know that 4 benched energy = 240, 5 is 280, and 6 is 320, that is basically all of the damage math you will ever have to worry about with Toedscruel. That being said, the sheer volume of game actions you will be taking from turn to turn with this deck is astronomical, maybe the most out of any deck I’ve ever played in all my years in Pokemon. Between teal dances, bug catching sets, Fezandipiti, draw supporters, restart, and when to drop your other trainer cards, the order in which you play these can boost your win percentage little by little, adding up to huge differences in win percentage. With good sequencing, you can take this deck from a deck that wins like 45% of the time to 60% or 70%, depending on the matchup.
If you’re a bit unfamiliar with proper sequencing in Pokemon, I think the following segment will be helpful to you. If you are familiar, I still think you might want to read it so you can reenforce what you already know about sequencing, and specifically make sure you are doing it right in the context of Toedscruel ex.
The first kind of sequencing I’m going to talk about is what I call basic sequencing. This is the play pattern I default to, and is basically always the correct sequencing on turn one, and always the correct sequencing when you have limited information, like, you have been unable to get any kind of deck search even by turn 2. Also, I hate to say it, but this is what I do when the situation is too complicated as well, because I’m not smart enough to figure out the truly correct play. So, what is basic sequencing?
Play your cards from what you have the least authority over to the most authority. This is the most important principle of basic sequencing. What I mean by authority is like, how much say you have over the effect of your card. For example, you have no authority over a Teal Dance. It gets you whatever card is on top, and you cannot choose whatsoever. On the other hand, you have some authority over a Bug Catching Set. If you have 3 grass Pokemon/energy, you can choose which of the two options to go with. In this case, it’s important to teal dance first, and then play the bug catching set afterwards. This is because whatever card you see of the Teal Dance is now known information and can inform you on what you want to get off of the bug catching set. This is really important, so if that didn’t make sense to you, please try to reread and understand what I meant when I said that. Finally, for something like an Ultra Ball, you have the most authority on it, because you can choose any of the whole deck. In fact, after the first deck search, you will know exactly all of the options your deck search cards can give you. So, for basic sequencing, you will always go with what I call “raw draw” (teal dance, Mew, Fezandipiti) first, then “selective card advantage” (bug catching set), and finally, deck search and other actions where you have the most authority.
Before you play any card on turn one with the deck, I would ask myself, “is this the right time to play this?” Let’s give an example:
You’re going second. Your opponent starts Dreepy. Your hand is Teal Mask, 2 energy, 2 Toedscools, a Bug catching set, and a nest ball. Let me say right now that you should start the teal mask in this situation going second by the way. Your best starting Pokemon going first is Toedscool, going second it’s teal mask Ogerpon or Mew ex, unless you are absolutely sure you want to Budew your opponent going second, in which case it’ll be Budew. Anyhow, you draw for turn, and it’s a research. What’s the first thing you do here?
If you said put down your Toedscools, that’d unfortunately be incorrect. In these situations, it is SO important that you always TEAL DANCE FIRST. By teal dancing first, you are able to decide whether or not you want to take those other actions having more information than before. In fact, it is a strictly worse play to put down the Toedscools first, because you can simply always put down the Toedscools after. This illustrates another principle of basic sequencing: you never take a game action before the last possible moment it is available to you. What do I mean by this? You should always do the game actions that introduce more information to you first. Anything that adds new cards into your hand or digs you deeper into your deck is giving you more information on what options you will have this turn and on the following turns. An extremely common mistake I see among newer players is retreating in the middle of the turn, then playing a draw supporter. This is always strictly worse than doing it in the other order: if you play the draw supporter first, you have more information about what you want to retreat into now. In fact, there is no reason in this deck to retreat at any point before the very last possible moment: right before you attack!
Let’s go back to the scenario. You teal dance, picking up a Squawkabilly ex. (reminder for readers only: Hand is Toedscools, energy, bug catching, nest, research and squawk now) What is the next play?
Remember: least authority to most. So, next up is the bug catching set. You pick up a teal mask Ogerpon and an energy off of it. Next up? Teal dance again! Now you get an energy switch. What is the next play?
It’s definitely nest ball, because it is the only play in hand that introduces any new information. You should get a Teal Mask Ogerpon here, as it completes the full setup (3 teal masks and 2 Toedscools). But what do we do after that? It actually isn’t teal dance here. It’s better to just energy switch and attack, planning to teal dance after the discard draw we are about to do. That way, you are able to filter energies out of your next hand, hopefully allowing you to get more real resources in hand. On the other hand, if you teal dance first, if you draw a real resource, you will be discarding it. This leads to a more Toedscruel specific sequencing principle: when possible, it’s better to filter energies after a hand refresh like Research, Iono or Squawkabilly. Reason is it’s best to end the turn with non-energy cards in hand rather than energy cards, and it’s also better to not discard important resources like Rod and Eswitch when possible.
(Reminder for the reader. Hand is Toedscools, research, Squawkabilly). Alright, what are we doing now? I hope you answered the following: put down the Toedscools and play research. I’d like to mention here that if you were not yet close to the knockout, it’s usually best to play both the Squawkabilly and research here, and use the research first. Remember, Supporter before Squawk on turn one, when possible. However, because we already have the knockout, there isn’t a real reason to put down the Squawkabilly here; we are already set up.
With that, I’ve covered all I have to say about basic sequencing with Toedscruel ex. Next up, sequencing with context.
Context-based sequencing is the sequencing we’re going to have to use when we have a lot of information about the current game state. Here is by far my most common example: it’s turn 2, we’re against Raging Bolt. They have just KO’d our Budew with a fan Rotom. You would not believe how many games I’ve played against Raging Bolt that were literally, word for word, this exact situation.
Let’s look at the context of the situation. We have no problem reaching 240 at this point; it’s basically a given. What we really need is a gust. We have teal dances, and we have this bug catching set, and a nest ball. What should we do?
I think a lot of you can already see where I’m going with this. Basic sequencing says: teal dance first, then bug catching, because we’ll have more information on what the bug catching choice should be, and finally, the nest ball. However, nothing we can get off of this bug catching set could ever be a gust card. Additionally, at some point during this turn, we are absolutely sure we should get a Fezandipiti ex, and bug catching set cannot pick up Fezandipiti ex. It’s time to talk about a word that gets thrown around a lot in the Pokemon community: deck thinning. Deck thinning is playing a card that removes cards that aren’t desirable for the current situation from the deck. Deck thinning before playing a card advantage card like research strictly improves your odds of finding the cards you DO want in the situation.
Going back to the scenario, it turns out the right answer is the complete opposite of what basic sequencing would’ve suggested. We should be nest balling for the Fezandipiti first. This thins one card, making it more likely that our bug catching set will find something. Then, we actually bug catching set next. This will remove 2 non-gust cards from the deck. Finally, we have maximized our chances of finding the gust off of our raw draw cards.
This gets complicated very quickly. In my match against Miloslav, I end up in a really interesting scenario on the last turn: I need to find Boss, Toedscruel ex, and an energy, and I’ve got a Bug Catching Set and a Fezandipiti. It’s true that if I Bug Catching Set first, I make it more likely to find the boss off the Fezandipiti. The issue is, if I Fez first and then Bug catching, that makes it much more likely for me to hit what I need off the bug catching, and thendepending on my hand if I still don’t have boss I will probably have teal dance as an option to keep going. In this situation, I did end up deciding to go Fez first, and I hit the boss for game, while also hitting the other 2 necessary cards, although it was very likely for my bug catching to hit those anyway.
To sum it up, basic sequencing is what you do on the first couple of turns, context based sequencing is basic sequencing with some slight deviations, which is what you do once the game has developed a bit to the middlegame, and you have more information about what exactly the rest of the game is looking like.
Ok, I’ve now covered what I wanted to say about both the general gameplan of the deck, and the sequencing knowledge necessary to be able to play the deck. Lastly, we are now going to look at matchup specifics.
Matchup Specifics
Let’s start off with Dragapult ex. I’m going to separate this into 3 different decks by the way: straight Dragapult, Dragapult Dusknoir, and Dragapult Charizard.
In general here’s the plan. We are going to go second and turn one Ogerpon attack. Put the immediate pressure on and try to disrupt set up first: if they didn’t play a buddy buddy poffin on turn one, it will be very difficult for them to get their Drakloak engine going. On the other hand, if we lose the flip and go first, our plan will be to just hold a hand with Toedscruel ex and energies in hand, then just evolve up and attack with Colony Rush.
Looking at the overall prize map, against straight Dragapult and realistically against Dragapult Dusknoir as well, we are looking at a 1-1-2-2 prize map, taking 2 prizes before a Dragapult can ever attack. That is assuming both players set up perfectly; more realistically, when we are going second, we actually have a huge advantage, where their turn one setup will be difficult and we can capitalize with aggressive Ogerpon plays and dismantle their board. Look for opportunities to remove energy from Drakloak, even if they have 2 down. If their next move is to attack with a Dragapult ex, we can overextend on this one turn to KO their only powered up Dragapult ex and leave them with no energy in play. It becomes virtually impossible for them to disrupt us from that point because Ursaluna is unable to OHKO Toedscruel ex and they can’t phantom dive on the next turn. It’s important to remember, if we are trading 2 prizes for 2 prizes but we started ahead 2 prizes, that means we are going to win the game.
Now, about absolutely abusing protective mycelium. Against straight Dragapult, we have little to worry about. Their only spread is phantom dive, which doesn’t matter on Mew ex or Squawkabilly ex, since after 3 phantom dives they should have naturally taken 6 prizes anyway. So, it’s most important for us to actually protect our Toedscools with the energies. The fact that we can put down a Toedscool and immediately drop an energy on it is basically the whole reason the matchup is playable at all.
It’s extremely important to have Mew ex down against all Dragapult matchups. Whether they stamp or Iono, at some point, part of our prize map plan will be ohkoing a Dragapult ex through disruption. The plan is: if they KO the Mew ex, that means they’ve activated Fezandipiti. A good Dragapult player, however, might recognize that their better play is to 200 an Ogerpon and expect to be Hawlucha-ing it later. Combined with a stamp, this is where the Mew ex really shines, making it much more likely for us to draw into a research and be able to reach for the KO on the Dragapult ex.
There is another sketchy line that I don’t recommend, which is avoiding Mew ex altogether and keeping a fully protected bench. The idea is that Hawlucha can only ping 2 210 hp Pokemon, so Dragapult’s phantom dive will only be able to take 2 OHKOs, allowing us some leeway in sometimes whiffing Dragapult kos. The issue with this is our opponent probably just has Ursaluna in the deck, and can pretty easily manually attach 2 energy to make this strategy invalid.
On the topic of Mew ex, this is where there’s a huge difference between how we play against straight Dragapult and Dragapult Dusknoir. Against Dragapult Dusknoir, it is vitally important that we drop an energy on the Mew ex. This is because phantom dive 60 + Dusknoir’s 130 will be able to essentially trade 1 prize for 2 prizes if we don’t protect it. Looking at the prize map, even if we start up 2, that will actually put them ahead! Against straight Dragapult, however, we would expect that if we e-switch onto the Mew ex, that becomes an extremely juicy target for a cc phantom dive play. This is why for the most part, Dragapult Dusknoir is a slightly more difficult matchup than the straight Dragapult matchup. Their deck is more inconsistent, but we are required to find a lot more cards to execute our game plan well.
The final Dragapult deck I want to discuss is the Dragapult Charizard deck. A good Dragapult Charizard player playing the matchup will likely make it look a lot more like a Charizard deck with a Dragapult draw engine, especially in this matchup. If we go for a careless Ogerpon donk on turn 1, it’s not a lot to ask for our opponents to just chain candy Charizard into candy Charizard and finish the game with 1 Hawlucha + boss + phantom dive. Our best move by far is to target the Charmanders and attempt to prevent our opponent from building a lot of energy in play. If they do manage to get out 2 Charmanders, I recommend not going for Ogerpon attack in this situation, and just waiting to get into Toedscruel ex. This is because getting into Charizard + gust is not exactly guaranteed with the deck. There are a couple of lines we can take, such as continuing to remove the Charmanders and switching to resource denial mode with the baby Toedscruel, or we could try to remove the Drakloaks if they only have 1 or 2, preventing them from finding what they need at the end of the game to close out. Either way, the most important thing to do in this matchup is to be keenly aware of the options your opponent has. Charizard is the most obvious on board one. Another scary option is Chi-yu. If they play Chi-yu then one option they can go for is pre-benching a Chi-yu and just manual attaching to it. If they do that, we are basically forced to either gust Chi-yu and knockout, or go for Fezandipiti’s cruel arrow, as Fezandipiti itself is safe from a Chi-yu knockout. These are just a couple of ideas, but like I said, just try to be aware of what your opponent has as options.
I think that just about covers what I had to say about Dragapult. In summary, go second, try to deny energy. Win the prize race by quickly going up 2 prizes, then get ready to be disrupted by having Mew ex and Ogerpons down. Reach hard when necessary to KO Dragapult ex. Protect your Pokemon with Protective Mycelium. Protect Mew if your opponent is on Dusknoir. Always be aware of what your opponent is able to do, which is vastly different for the different Dragapult variants.
Next up, a bit of an easier matchup: the Grimmsnarl matchup. We have a easily understood ideal boardstate: all our Ogerpons, 1 Toedscruel ex, at most one Toedscool. That’s it. The reasoning behind is this is that we don’t need to reach for knockouts at all: they come to us extremely easily, actually. We aren’t worried about losing our one Toedscruel ex at all because Ogerpon itself easily KOs Grimmsnarl. In fact, even if they have Bloodmoon, which most of the time they won’t, we can just double e-switch onto a Mew in one turn and between Frosslass and genome hacking we can still one shot the Bloodmoon from no Toedscools in play. Only other thing I have to say is that if we aren’t taking 2 prizes on a Grimmsnarl ex, it’s better to KO a Frosslass than a Munkidori.
So, don’t overbench. OHKO Grim, KO Frosslass otherwise. That’s the whole matchup plan.
Now for Raging Bolt. Again, choose second, just because our deck is way more consistent going second, and a turn one knockout from the bolt deck would not be impossible, and would be extremely annoying for us. Now, the game plan is pretty decently different based on whether we are going first or second.
If we are going second: try to set up the best we can, then use Budew. Since we turn off their prime catcher, this makes it very unlikely they will be able to take 2 prizes on the next turn, although it is technically possible if they have all three energy types, Raging Bolt, Ogerpon, and a fan Rotom out in their opening hand. This is a rare case where if you know your opponent has the 2 prize KO in hand, it’s much preferable to drop a turn one Iono than a research in this situation, to the point where I would dig for it with Mew and Squawkabilly. The key to the entire matchup is to be the player to take the first 2 prizes. If you manage this, you will likely be able to get through the rest of the game.
If we are going first. Make sure to stick a one prize Toedscool active and prepare yourself to try and gust and take 2 prizes on the following turn.
Some other advice in the Raging Bolt matchup: try not to put Fezandipiti down until the very end; it can get very annoying if our opponent goes like, slither wing sada prime catcher on Fezandipiti. It asks us to find a lot, especially after having lost our Fezandipiti. Depending on the situation, it can get to the point where they can leave a no 2 prizer board and actually put us in a sort of checkmate. Basically, just don’t put down Fezandipiti unless you really have to or it’s the end of the game.
If we are winning the prize race, our goal for each turn will just be to take 2 prizes. If we are losing the prize race, say because their opening hand just had Crispin Ogerpon prime catcher in it, I certainly wouldn’t say it’s all over yet at all. There is another angle to the matchup: baby Toedscruel. Turning off energy retrieval and night stretcher can be really devastating for the Raging Bolt deck. I remember vividly a game in Portland where my opponent Squawkabillied away just one Raging Bolt ex on turn one. However, since I knew that Raging Bolt lists these days only play 3 bolts, I just put down my baby Toedscruel and koed 2 bolts. I was losing the prize race, but they had no way to take the last 2 prizes.
Finally, Mew ex is a really, really nice attacker in this matchup. You don’t even really have to worry about setting up 3 Toedscruel ex, I’d say that you should just go for 2 Toedscruel ex and rely on copying bellowing thunder to be the last attack of the game.
Gardevoir ex is by far the hardest and most complicated of the four most common matchups. I can’t really give a prize map like I said with Dragapult or Bolt because the way you play the game is so different based on the situation. I’ll just suggest some things that we can maybe try.
The most important card in the matchup is usually the baby Toedscruel. If we are up against the “Brixty,” turning off these night stretchers really limits our opponents options, preventing them from using 2 Drifloons/2 Scream Tails at all. More realistically though, lists are shifting more towards Arven, one rod, and TM Evo, which is definitely a meta shift that is detrimental for the Toedscruel players.
Say the game goes something like this: we get up one prize, they Drifloon us with a bravery charm. In this spot, our best play by far is to evolve baby Toedscruel and return the knockout. This will leave the prizes at 4-4. It’s quite possible for us to lose the game from this position, depending on what list our opponent is running. If they are on the one rod, they can recycle the Drifloon here, find a second charm and KO us, from which point, even if we KO the Drifloon and they are unable to win next turn, we will still be at 3 prizes, so they just win the game across 2 attacks: a miracle force on our Toedscruel ex followed up by a Scream Tail. Also, you should know that a miracle force + 3 adrena brains KO’s a Toedscruel ex as well.
A play that works surprisingly often is trying to rush KO on Fezandipiti ex, turn off stretchers with baby Toedscruel, and then drop a late game Iono. The gardevoir deck actually doesn’t have a whole lot of draw, and by doing this play, we are effectively locking them out of Fezandipiti. Off an Iono to 2, it’s decently easy for them to just whiff having what they need late game.
Another avenue is just trying to set up deny. In both games 1 and 3 on stream against Miloslav I end up KO-ing the only ralts he has in play by drawing prime catcher early, which led to advantageous positions for me.
This matchup is looking like it will be getting even more complicated going into the world championships. I haven’t played any games against jellicent in Gardy, but I can’t imagine it will make the matchup simpler. Overall, I’d say this matchup is really hard to play, and you kinda have to wing it based on the situation. Just remember, resource deny with baby Toedscruel, be aggressive, try to limit their options.
Miraidon looks like it’s becoming a possible popular choice for the world championships, and there is really nothing to say about the matchup. Try to take 2 prizes first. If they don’t power up iron hands, you can Budew on turn 1. I wouldn’t really change anything about the current decklist to adjust for the new deck in the meta.
Gholdengo is my favorite matchup to play with Toedscruel because we play it in a way completely different to any other matchup. Don’t worry about the prize race at all, it doesn’t matter! Once they discard any real amount of energy, usually 6 to KO a Toedscruel ex, then we evolve baby Toedscruel. Their only real play from this spot will be to gust up the baby Toedscruel and KO it with 3 energy. Then, we simply rod back the baby Toedscruel and put it back down, completely locking them out of make it rain for the rest of the game. If for whatever reason we aren’t able to immediately reestablish the Toedscruel on the next turn, it’s no problem whatsoever, we just stall with Budew for a turn and reestablish next turn. I have yet to lose a best of 3 to any Gholdengo player.
The only other option they have is to try to rush Dragapult ex. Simply KO the Drakloak with energy. Even removing their one fire locks them out of phantom dive.
Against Joltik box, our plan is quite simple: whether or not we are going first, we are able to get the first big attack. We should try to use that opportunity to take 2 prizes, especially great if we are taking out whatever they put energy on with Joltik. The only exception is Pikachu ex; if they power that up, go for a different 2 prize KO. If they Pikachu ex our Toedscruel ex, then we just Budew to negate the Pikachu ability. They are unable to Crispin and prime catcher from there, so they can’t really take 2 prizes next turn, which puts the prize race favorably in our favor. Don’t be afraid to Budew both Pikachus if they try to put down a second one and spend a turn Joltik-ing onto it.
If you happen to play against Garchomp ex, we just one shot the Garchomp ex easily. That’s the whole plan. It sounds goofy but it’s really true.
Eevee box is our hardest matchup because they can take the first prize, chain 3 Flareons, and on the third one, just use briar to steal the prize race in their favor. Ceruledge isn’t a real deck, but they can do the same thing. Our problem is simply that whether or not they take 1 prize or 2 prizes first, they are still winning the prize race. Our only real line is to try and disrupt with baby Toedscruel early and Iono late game, hoping that they cannot chain 3 Flareons. That’s really all I have to say about the matchup.
Closing Thoughts
With that, that’s some of my thoughts on Toedscruel. I think going into the World Championships the deck is looking like a much worse play than it was for NAIC but maybe still an ok play, it definitely takes a solid matchup spread across the board, but Gardevoir is looking like it will be more annoying than before, and although I haven’t played many games of the matchup, I don’t imagine that Miraidon ex will be a good one. Hope you enjoyed hearing what I have to say!